Part 4 Light has been a long piece of coursework - perhaps the longest in The Art of Photography. At times, I feel I have been working on the Course full-time - and that's challenging and brilliant. For this assignment we are asked to draw together the different lighting techniques we have been studying and apply them to one object. The idea is to use our new knowledge of lighting to bring out particular physical properties of the same object. It is also a test of our observation. We are asked to choose any subject that we can move around and take 8 photos based on the four themes of the assignment - Shape, Form, Texture and Colour.
Shape
This quality has to do with the outline of an object – its edges. These are likely to stand out
more clearly if they contrast with the background, and if there is minimum detail visible in
the object.
Form
This is another way of describing the volume of an object - how three dimensional it looks. The
modelling effect of the light and the way you deal with the shadows is all important. Try to
show as much depth as possible in the subject.
Texture
This is a quality of the surface detail. Fine detail, such as that on sandstone or skin, stands
out best with a pattern of small, hard shadows, so you will have to consider both the
diffusion (or lack of it) and the angle of the light. Of course, a shiny surface like chrome,
although it is thought of as being smooth, also has a texture of a kind.
Colour
Choose a kind of lighting and exposure setting that shows the subject’s colour (or colours) as
strongly as possible. In addition, you could photograph your subject in any other interesting,
unusual or attractive lighting.
My first consideration was choosing the right subject. At first I thought of a small air compressor I had bought following a puncture in Devon. However, some test shots proved that this black mundane subject was not going to offer the right opportunities to capture the features above. Next I thought of using one of my photoshoot friends - a handsome guy or beautiful girl, or one of my grandchildren. But then I thought the shoot could be a long one. (It was - 300 images shot over a two day session). I liked reading about the challenges of photographing metal in the course book Light: Science & Magic. So. liking a challenge, I decided to photograph a still life of three metal kitchen utensils.
My lighting set up was made up of equipment representing two extremes. On day one I used three studio lights - a main light, a fill light and a snoot - operated in various combinations. Also a reflector. Proper gear!
On day two I used a YongnuoRF-603N flashgun.
Camera gear used was a Nikon D7100 on manual with a Sekonic flash meter to balance and develop the lighting. I use a remote trigger cable and also the camera shutter delay timer on some of the shots in order to be able to move around the set with the reflector and flashgun as a 'one man band'. No Assistants here 'a la' Anna Fox. My two lighting sets ups which were changed and moved around, switched on/off during each image shoot are illustrated below. Finally, I asked myself whether this has to be photographic art of simple kitchen utensils or a demonstration of understanding of lighting on any boring subject? With my commercial business hat on I might imagine I am shooting these utensils for a marketing campaign for the manufacturer or a kitchen gear retailer.
On a general note, I am trying to remember the advice given to me by my tutor about consistency and themes and so I am shooting all the images in a landscape format and keeping the visual presentation consistent in style of approach and context.
All images can be enlarged by clicking on them.


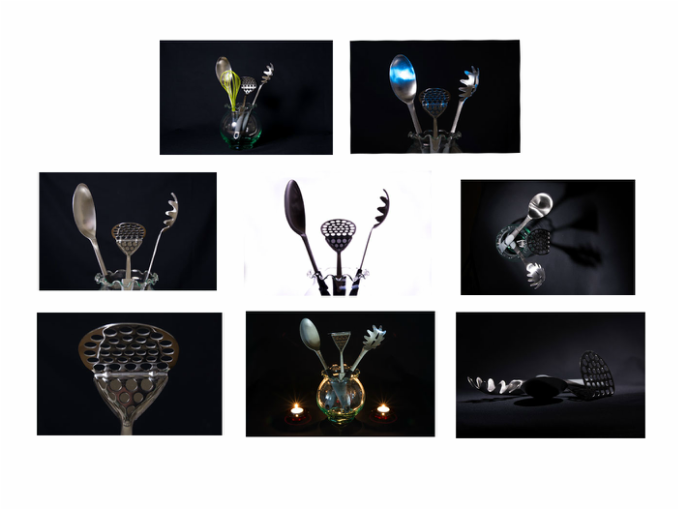
For this first pair of images about Shape we are looking to profile the edges and get the outline of the three utensils with minimum detail visible.
The first image is very different from the other seven images in how the lighting was done. A large piece of cotton fabric measuring five foot by five foot was hung a few feet behind the objects. A studio light with diffuser was positioned behind this screen to produce effective rear lighting. A silhouette was achieved outlining the three utensils as shapes.
The second image was achieved in a very different manner. A single flashgun without a diffusser was positioned above the objects and set up in manual mode at 1/16th power and zoomed to 105mm to produced a concentrated column of light.
The images are very different - one without shadows and the other with harsh shadows. Both methods of lighting seem to produce the shape concept we are looking for.
22@1/125 iso200 50mm lens f8@1/125 iso200 42mm lens


The second pair of images are about Form. We are looking at the volume of an object - how three dimensional it looks. We need to try to show as much depth as possible in the subject.
The first image is taken with typical studio lighting - one main light at f11 and a fill-light at two stops less at f5.6. The background is not lit and is maintained as black. We are getting the three dimensional effect with this standard style of lighting. The curvature of the neck of the vase seems to add dimension to the depth of the image.
In the second image we are not using studio lighting or a flashgun but candle power. Three small t-lights have been used. There is one each side of the subject and one at the rear to give back lighting. A small aperture of f16 has been used to create a starburst effect with the candlelight. As with the traditional studio lighting, we have tried to show the form of the utensils.
f4@1/125 iso200 27mm lens f16@8secs is0200 50mm lens


The third pair of images are concerned with Texture. We are looking to capture surface detail .
The first image is a close-up of one of the utensils. Of the three utensils, this one with its perforated surface provides the most interesting surface detail. The perforations reflect in the chrome below. The perforations and texture of this utensil makes excellent mash potato! This was shoot with studio lighting with some extra light push in with a Lastolite reflector.
The second image is from a position above the subject. This is also where the light is positioned - a single flashgun. The aim has been to capture the texture of the three implements with harsh lighting - maybe "Hitchcock style" - but these are not dangerous tools, merely simple kitchen utensils.
f5.6@1/125 iso200 50mm studio lighting f8@1/125 iso200 18mm lens single flashgun zoomed


The final and fourth pair of images are about Colour. We are looking to show the subject’s colour or show it in any other interesting unusual or attractive lighting. As this is very much a black and white sequence of images of metallic objects, how can we introduce colour? The answer lies in a snoot with a blue filter.
The first image maintains the standard 'pose' of the utensils. They have a semi-polished metallic finish and we have introduced a snoot with a blue filter to bring some colour into the scene.
For the second shot we have to think of something different other than introducing a different colour in the snoot. So we have introduced an 'intruder' - a 'cuckoo in the nest'. The yellow whisk is my favourite kitchen utensil for making omlettes - 'bon appetite' - hope you have enjoyed these eight images!
f5.6@1/125 iso200 50mm lens f4@1/125 iso200 34mm lens


Demonstration of Technical and Visual Skills
I found Part 4 Light a very exciting part of the course, especially having read previously read at the beginning of The Art of Photography, in Graham Clark's book "The Photograph" that 'photograph' means 'light-writing'. I suppose that from the time we are born, we take light for granted. Like the Colour assignment, I had a few false starts as I took time to consider a number of subject options, including the air-compressor that had got me out of a punctured tyre situation and which I thought could form a piece of 'art', and the idea of using live models but who may not want to sit around for too long!
Turning back to my reading of "Light Science & Magic" which I had read some time before and which is reviewed in my 'Reading' section, I referred back to this book for this assignment. The section of the book on metal states that many students think metal is one of the most difficult photographic subjects. Metal is among the half dozen classic subjects that the book says that students are supposed to encounter as they learn lighting. Liking a challenge, it was metal that became my subject. I used three kitchen utensils as my subject. They were patient with me, did not argue and did not walk off the set.
My approach was to set up two different types of lighting set up. The first was a set using up to three studio lights and reflector. The second set was a simple one light set using a simple £50 Yongnuo flashgun. From some three hundred images which were shot over two days in part of my lounge, I selected my eight images for the assignment.
Reflecting on my demonstration of skills, I am pleased with how I approached and delivered this assignment having learnt from the exercises, used my previous study of "Light Science & Magic" and prior knowledge of the several lighting courses I have been on during the last few years. I was fortunate to have the right materials and equipment on hand and understand the methods of setting up, positioning and measuring lighting. In addition, I introduced 'candle power' which has not been mentioned in the course as a means of creative lighting. So from the practical aspect of skills, I was happy and also pleased with how I created the sets and composed the still life arrangements.
Quality of Outcome
I am pleased with the final set of four pairs of images chosen from the two day shoot that I hope meet the assessment criteria for this assignment. I was trying to imagine that if I was the manufacturer or retailer of these kitchen utensils whether I would use them in the product sales and marketing material. Looking at this work from a commercial perspective, which tend to be my way of thinking, rather than pure art, I think some might help portray the product. In terms of art forms, I am not sure where these images would stand. They are not the images I would want to display on my wall, but I think they do demonstrate the requirements of the assignment - Shape, Form, Texture and Colour - albeit the colour aspect took some thinking about - which leads us on the creativity.
Creativity
There were three aspects to trying to be creative in this assignment that I think evolved for me. The first issue was how to introduce the colour element. The first idea of using a snoot to push some blue light on to the metal was a creative solution I think. What about the second colour image? A different colour light? I thought this would be repetition of the idea for the first colour image and came up with the idea of introducing a 'stranger' into the last shot - another utensil. I think this worked.
The second creative thought was to ditch the whole lighting set up and see what could be achieved with a cheap manual Chinese flashgun. The creativity in this involved setting up the shot and then positioning the flashgun and lighting the subject. I used the flashgun at a fraction of it's power on a lighting stand above the subject and zoomed the flashead to it's highest 105mm zoom setting to concentrate a single beam of light onto the subject. I was pleased with the result.
The third creative thought came from the first image in the series and the only image with a high contrast background. I positioned a studio flash on a stand with an umbrella diffuser behind a five foot by five foot piece of Indian cotton backdrop and pushed the light through to backlight the subject. This gave me the effect I was looking for - a silhouette. This image in a way is the odd one out bearing in mind my tutor's response on maintaining consistency in a project. However, presented with the other seven images in a panel, I think this could be a catalyst to provide extra interest if the prints were being presented as a panel. (See image below).
None of these three areas of creativity have I attempted before so there was a real learning process here, not just in the preceding exercises but in the assignment itself.
Context
Finally, in terms of context, I have tried to do my best in the assignment through reflecting on the assignment brief, considering (and trying out) a few different ideas, and settling on the kitchen utensil idea. Some of the course reading has helped such as Light Science & Magic. It was also useful during this part of the course to visit the latest exhibition in the "Wish You Were Here" series at Ffotogallery's Turner House organised by OCA tutor Helen Warburton and study the still life type images of Janire Najera which is reviewed in the latest part of my Exhibitions section of this Log. Her approach to photography ordinary pieces of obsolete equipment were useful in preparing for this assignment. Janire's work documents the last days of The Black Hole, a military surplus store in northern New Mexico. I have also done some critical thinking and reflection during this process by revisting, questioning and modifying some of the ideas, learning and training I have experienced previously. I need to know now whether my work meets the standards set and whether I will be ready for assessment at the end of The Art of Photography course, and the areas I need to improve upon.